Showing posts with label Grails. Show all posts

Saturday, September 17, 2011

How to create a consistent look and feel with Grails Layout ~ Grails Tutorial 3

So far we have created a controller and a view, and we have learned how to pass values from the controller to the view. Although we can now start improving the look and feel of the store with fancy HTML or CSS codes, but that means we would need to do that with every single gsp we create.

Would it not be great if we can create a template for all the pages in the application with the same header, the same menu, the same footer? That way we can always be assured of a consistent look and feel across the store.

The answer for this question lies in Grails Layout, and our objective in this session is to:
  1. Create a template that apply to all the different views in the application with Grails Layout
To have all the actions in our CatalogController share the same layout, we will need to create a layout file with the same name at /grails-app/views/layouts. Lets create the following file now then:
/grails-app/views/layouts/catalog.gsp
Again, grails' convention over configuration is put at work here. We don't have to write any XML files to wire the two together. Everything works just perfectly. Below is the code snippet for catalog.gsp:
<html>

 <head> <title> Camgear - <g:layoutTitle/></title>
  <link rel="stylesheet" href="
   <g:createLinkTo dir='css' file='camgear.css' />
  " />
  
  <g:layoutHead />
 </head>
 
 <body>
  
  <div id="header">
   <img src="
    <g:createLinkTo dir='images' file='camgear-logo.gif' />
   " alt='logo' height='100'/>
   <hr />
  </div>
  <g:layoutBody />
  
  <div id="footer">
   <a>All Rights Reserved</a>
  </div>
  
 </body>
 
</html>
Of course, we will still need to put the camgear.css file in the
/camgear/web-app/css
folder. The following is a sample css file that I used:
body {
 font: "Helvetica Neue", Trebuchet MS, Verdana, Helvetica;
 margin: 0px;
}
#review sub {
 font-size: 2.5em;
 display: block;
 margin: .5em;
 padding: .5em;
 background: url(../images/background.png) repeat-x;
 border: 1px dotted black;
}
#review con   {
 font-size: 1.5em;
 text-align:right;
 margin-right: 2em;
}
#nav {
 text-align:right;
 margin-right: 1em;
}

#header {
  background: url(../images/logo-background.gif) repeat-x;
 padding: 0px;  
}
#header img {
 padding: 1em;
}
#footer {
  background: url(../images/background.png) repeat-x;
 padding: 0px;  
}

#footer a {
 font-size: 0.7em;
 display: block;
 color: white;
 text-align:center;
 margin-top:30px;
 font-family:"Lucida Handwriting", Verdana, Helvetica;
}

#menu {
 background: url(../images/logo-background.gif) repeat-x;
 padding: 5px; 
}
#menu li {
 display: inline;
 margin-left: 5px;
 margin-right: 5px;

}

#menu a {
 font-size: 1.5em;
 text-decoration: none;
 color: #4F82B5; // #14477A
}
Once all these are done, all we need to do is to refresh our browser, and we will see a totally different web page; I mean it feels as though technology has evolved for 10 years with just these two changes. We now have a standard header, standard footer and more importantly, a standard theme. Note that we have not done anything to the view we created yesterday.
So, that's all for today. We will talk about binding to the database tomorrow.
Related Articles
  1. Tutorial 1 - Creating our first controller in grails
  2. Tutorial 2 - How we present ourselves to the world

Friday, September 16, 2011

How to present our views to the world - Grails Tutorial 2

In the first article of this series of grails tutorial, we created a first controller.

Well, the truth is we cannot bring our store online yet. There was only 1 controller and it is not quite my favorite camera store yet. Besides, the presentation of our store, err... kinda sucks.

On top of that, we basically embedded the HTML in our codes, which is one of the most horrendous things any programmer can do. Unless I want to overtake Billo as the worst programmer of all time, we got some serious work to do.

So, meet Groovy Server Pages (gsp) - the grails solution to move the presentation logic out so that some artistic designers can work on them, and I can focus on coding the backend logic. Now, we all know that the infamous Convention over Configuration philosophy behind grails, and if we put the right file in the right place, everything will work out just fine.

And, and, and..... there is no configuration needed!!! Yay!

OK... lets focus on our objective today:

  1. Passing some values from the Controller to gsp,

We will talk about layout, data model and persisting data in some form of database in the following sessions.

Alright, first thing first, instead of rending HTML codes from the controller, we now do 1 step better; we keep some values here and pass them to the gsp for display. So, lets change our little controller like so:


def catalog = {
     
     def staticBrand = "Nikon"
     def staticModel = "D3S"
     def staticReview = "D3S is the best pro DSLR ever!"
     def staticReviewer = "JC Tai"
     def staticRating = 5

     [  
      brand : staticBrand, 
      model : staticModel, 
      review : staticReview, 
      reviewer: staticReviewer, 
      rating : staticRating
     ]

    }


Notice the square bracket? That's how the controller passes information to the gsp. Now, because of the convention over configuration philosophy, we do not need to create any configuration so long as we create the view here:


/grails-app/views/catalog/catalog.gsp


It is time now to write our view. Since my web designer is on leave today, I created the view by myself; and boy! This has already pushed my creativity ability to the limit! Lets see how it looks like:


<HTML>

 <HEAD>
  <TITLE>Camera Gears Review & Catalog</TITLE>
 </HEAD>
 
 <BODY>
  Brand: ${brand} <br />
  Model: ${model} <br />
  Review: ${review} <br />
  Reviewer: ${reviewer} <br />
  Rating: ${rating} stars <br />  
 </BODY>

</HTML>


Once we do that, grails automatically wires the controller and the view together. Not a line of XML has been written! Amazing! Now lets point our browser to


http://localhost:8080/camgear/catalog/catalog

and voilà!


If we are talking about cleaner codes, can any code be cleaner than this? Haha... joke aside. In just a few lines of code, we have managed to create a web application that is retrieving information from the controller, and yes, we have not done anything on database yet, but the simplicity of grails just blows me away!

OK, lets review what we have done so far:
  1. We have created a controller.
  2. We rendered HTML from the controller
  3. We stored some static values in the controller
  4. We retrieved these values from the controller and passed them to the gsp
  5. We have a VERY CLEAN web site running in just a few lines of code!
OK, so far so good. Next time, we will talk about a consistent layout for the entire web site. Stay tuned!
Related articles
  1. Tutorial 1 - Creating our first controller in grails
  2. Tutorial 3 - How to create a consistent look and feel with grails layout

Thursday, September 15, 2011

Creating our first controller in grails - Grails Tutorial 1

A few months ago I wrote an article about how grails makes it possible to write a quick application in 3 minutes. I knew I should have followed up with more stuff but works caught up and I procrastinated. I know, my bad, my bad...

Anyway, I am about to write a series of grails tutorial. Hopefully it can encourage more people to adopt this wonderful framework.

I love photography, and all the camera gears. So, lets base our tutorial with an online portal of camera products for browsing. Hopefully we can evolve this to something more substantial along the way.

OK, some fundamental first. The grails framework has been designed based on the MVC framework; and those who have developed in Spring Framework will find Grails a refreshing platform for rapid application development.

MVC Concept - The solid lines are direct association and the dashed one are indirect association.

So with that, we can start building our online camera catalog, and we are going to call our project Camgears. So lets create our first project with a simple command line:

grails create-app camgear

We will then see a bunch of activities happening in front of us. Once it's done, we will be able to start our application. The first thing that we need to do is to create a controller. Controller is the engine behind every grails application and they do the following few things very well:

  1. They receive user inputs from the web browser
  2. They invoke the necessary business objects to get things done
  3. They can also access your data model to retrieve information from your database
  4. And at the end they redirect the application to the appropriate pages for the end result to be displayed.

So with that understanding, lets start generating our first controller. First lets change to the proper directory:
cd camgear

Then we will generate the controller by issuing:
grails create-controller catalog

After this, grails actually create a the skeleton of the controller at /grails-app/controllers/CatalogController.groovy. The following is how the file looks like:

package camgear

class CatalogController {

    def index = {
    }

}

It looks pretty simple right now. But note that grails has actually created a simple index action for us. Lets say we really want the users to be automatically be routed to the catalog every time they visit our site, we can do the following:

package camgear

class CatalogController {

    def index = {
     redirect( action: catalog )
    }
    
    def catalog = {
     render "<h1> Welcome to our store </h1> <br>Under construction."
    }
}

Lets try to see if this works. Grails comes with a handy web server, and even in memory database (more to that later). To execute this, all we need to do is to run the following command:

grails run-app

And when everything is ready, point your web browser to:

http://localhost:8080/camgear
And you will see a nice web page with all the dirty work that grails has done for you. You can even see that the camgear.CatalogController has already been defined for you:


Now, lets click at the camgear.CatalogController and see what happens:


Something cool happens if you type the following URL:

http://localhost:8080/camgear/catalog/index

The page automatically gets redirected to

http://localhost:8080/camgear/catalog/catalog 

because of this code:


    def index = {

     redirect( action: catalog )

    }

Pretty neat huh? We only wrote a few commands and with only a few lines of codes, our first application is already up. That took less than 5 minutes.

I know, I know... some of you are going to complain about embedding HTML codes into the controller, which is a horrible idea. But we are going to make changes to this later in View and Layout.

Stay tuned.


Related articles
  1. Tutorial 2 - How to present ourselves to the world
  2. Tutorial 3 - How to create a consistent look and feel with grails layout


Saturday, October 2, 2010

How do you write a functional CRUD application in 3 minutes?

I came across a wonderful framework recently and was totally blown away by it. The simplicity of the framework, totally boast productivity to a new level.

Grails, an open source web application framework, aims to reduce the traditional XML configuration of Enterprise Java Application Development to the minimum. It favors convention over configuration, and to a programmer like me who hates to see another line of XML, Grails is like a God sent. Grails has been designed based on Spring and Hibernate framework, and it can be used to build Enterprise Grade Application.

The following is a simple design principle taken from Wikipedia:

"XML was initially welcomed as it provided greater consistency to configure applications. In recent years however it has become apparent that although XML is great for configuration it can be tedious to set up an environment. This may take away productivity as developers spend time understanding and maintaining framework configuration as the application grows. Adding or changing functionality in applications which use XML configuration adds an extra step to the change process next to writing application code which slows down productivity and may take away the agility of the entire process.

Grails takes away the need to add configuration in XML files. Instead the framework uses a set of rules or conventions while inspecting the code of Grails-based applications. For example, a class name which ends with Controller (for example BookController) is considered a web controller."

Anyway, you can read up the background and theory later if that interest you. My main goal today is to show how easy it is to build a simple Grails application within 3 minutes.

After downloading the latest Grails from their download pagehere, you can proceed with the few simple steps to it up rather quickly.

OK, lets review our objective today:

  • I want to build a simple Application to track what sort of cars my customers drive

  • To achieve that, I will need a simple customer object - with the usual first name, last name, birthday, income group, and the kind of car he drives.

  • As I want to control the sort of cars I have in my database, I will just create a car object. In which you can find all sort of cars in there.

  • I will also create an income group object. That way this parameter can be configurable as well.


  • So all set. Lets start.

    First thing I do is to create a grails application. This can be done by simply issuing the following command. Lets call our application CIS [Customer Information Portal]:
    grails create-app CIS

    You will see a tons of texts flying out from your screen. That means grails is generating the skeleton of the project for you. At the end of it, you will see the following line and then you know your application has been successfully created:
    Created Grails Application at /Users/lys/Test/CIS

    Now, we need to create three domain class. A domain class in Grails is basically a normal Groovy class. We will get into this in another article. From the above objective, we know we need to create three domain classes, namely:
    1. Customer
    2. Car
    3. Income Group

    So lets get to work. We can simply create the domain class by issuing the simple commands:
    1. cd CIS
    2. grails create-domain-class Customer
    3. grails create-domain-class Car
    4. grails create-domain-class IncomeGroup


    If we now navigate to CIS/grails-app/domain/cis, we can see that three files have been generated by Grails:
    1. Customer.groovy
    2. Car.groovy
    3. IncomeGroup.groovy

    Lets go ahead and define our customer object. Say it has the following properties:
    1. First Name
    2. Last Name
    3. Birthday
    4. Car
    5. Income Group

    This is very simple, eh? So lets go ahead and define it in the customer.groovy file:
    package cis

    class Customer {

    String firstName
    String lastName
    Date birthday
    Car vehicleMake
    IncomeGroup annualIncome

    }

    And we will go ahead to define the other two objects. To make things really simple, I am putting income group as a string. You can always make it more complicated to meet your needs:
    package cis

    class Car {

    String manufacturer
    String model
    Integer displacement

    }

    package cis

    class IncomeGroup {

    String annualIncome

    }

    OK. We are done now. And that barely took 1 minutes. Now lets grails do the dirty work. We need to build those objects now. So issue the following commands:
    1. grails generate-all cis.Customer
    2. grails generate-all cis.Car
    3. grails generate-all cis.IncomeGroup


    We are all done by now, and YES, our application is ready to run! Issue this command and see what you got:

    grails run-app cis

    Grails at this point will start up the web server, and your application is served. You can view your application here:
    http://localhost:8080/CIS/
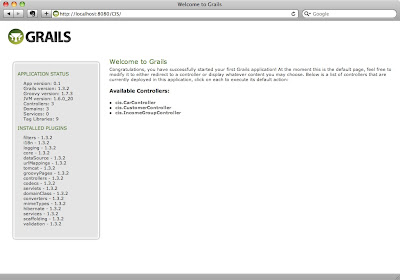


    Great! All our controllers are there. Click at cis.CustomerController, and you will see a simple list where all the customer are supposed to be. Click at create a new customer, and the following screen came up.

    I have taken the liberty to fill up some of the information I have. Since we have not defined any car make and income group yet, I am going to leave it empty.
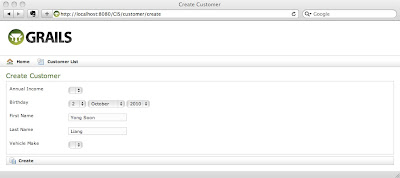


    Click "Create". Oh No! I cannot create! Grails is telling me that the car make and income group fields are mandatory.
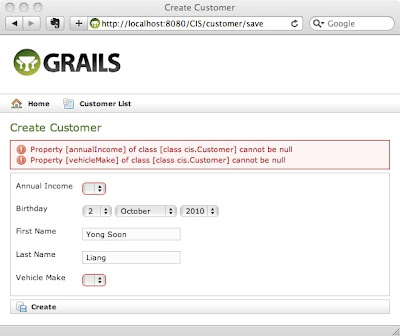


    But wait! I did not even do a single line of coding. All I did was putting in all the properties for each object only.

    Yes, in that 3 minutes we did this, Grails has generated the web front end, the domain class, the database tables, and the Validation logic for you!

    Ok, now lets put in all the correct properties for Income Group and Car and we can get this over with. The following is the final result. All the data are tabulated in a list. The view can be easily changed if we need to; but this is what we have for now:
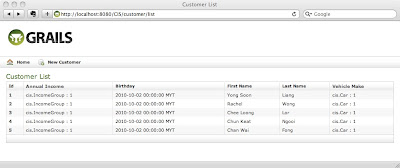


    Click at the Id, and it brings me to the detail page:
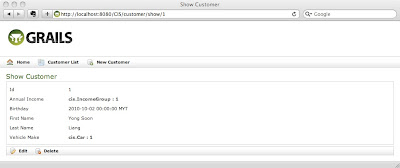


    Click at the Income group, and it brings me to the income group page.
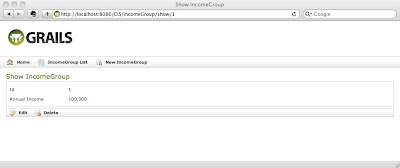


    Not bad for 3 minutes work huh?