Saturday, September 17, 2011

How to create a consistent look and feel with Grails Layout ~ Grails Tutorial 3

So far we have created a controller and a view, and we have learned how to pass values from the controller to the view. Although we can now start improving the look and feel of the store with fancy HTML or CSS codes, but that means we would need to do that with every single gsp we create.

Would it not be great if we can create a template for all the pages in the application with the same header, the same menu, the same footer? That way we can always be assured of a consistent look and feel across the store.

The answer for this question lies in Grails Layout, and our objective in this session is to:
  1. Create a template that apply to all the different views in the application with Grails Layout
To have all the actions in our CatalogController share the same layout, we will need to create a layout file with the same name at /grails-app/views/layouts. Lets create the following file now then:
/grails-app/views/layouts/catalog.gsp
Again, grails' convention over configuration is put at work here. We don't have to write any XML files to wire the two together. Everything works just perfectly. Below is the code snippet for catalog.gsp:
<html>

 <head> <title> Camgear - <g:layoutTitle/></title>
  <link rel="stylesheet" href="
   <g:createLinkTo dir='css' file='camgear.css' />
  " />
  
  <g:layoutHead />
 </head>
 
 <body>
  
  <div id="header">
   <img src="
    <g:createLinkTo dir='images' file='camgear-logo.gif' />
   " alt='logo' height='100'/>
   <hr />
  </div>
  <g:layoutBody />
  
  <div id="footer">
   <a>All Rights Reserved</a>
  </div>
  
 </body>
 
</html>
Of course, we will still need to put the camgear.css file in the
/camgear/web-app/css
folder. The following is a sample css file that I used:
body {
 font: "Helvetica Neue", Trebuchet MS, Verdana, Helvetica;
 margin: 0px;
}
#review sub {
 font-size: 2.5em;
 display: block;
 margin: .5em;
 padding: .5em;
 background: url(../images/background.png) repeat-x;
 border: 1px dotted black;
}
#review con   {
 font-size: 1.5em;
 text-align:right;
 margin-right: 2em;
}
#nav {
 text-align:right;
 margin-right: 1em;
}

#header {
  background: url(../images/logo-background.gif) repeat-x;
 padding: 0px;  
}
#header img {
 padding: 1em;
}
#footer {
  background: url(../images/background.png) repeat-x;
 padding: 0px;  
}

#footer a {
 font-size: 0.7em;
 display: block;
 color: white;
 text-align:center;
 margin-top:30px;
 font-family:"Lucida Handwriting", Verdana, Helvetica;
}

#menu {
 background: url(../images/logo-background.gif) repeat-x;
 padding: 5px; 
}
#menu li {
 display: inline;
 margin-left: 5px;
 margin-right: 5px;

}

#menu a {
 font-size: 1.5em;
 text-decoration: none;
 color: #4F82B5; // #14477A
}
Once all these are done, all we need to do is to refresh our browser, and we will see a totally different web page; I mean it feels as though technology has evolved for 10 years with just these two changes. We now have a standard header, standard footer and more importantly, a standard theme. Note that we have not done anything to the view we created yesterday.
So, that's all for today. We will talk about binding to the database tomorrow.
Related Articles
  1. Tutorial 1 - Creating our first controller in grails
  2. Tutorial 2 - How we present ourselves to the world

Friday, September 16, 2011

How to present our views to the world - Grails Tutorial 2

In the first article of this series of grails tutorial, we created a first controller.

Well, the truth is we cannot bring our store online yet. There was only 1 controller and it is not quite my favorite camera store yet. Besides, the presentation of our store, err... kinda sucks.

On top of that, we basically embedded the HTML in our codes, which is one of the most horrendous things any programmer can do. Unless I want to overtake Billo as the worst programmer of all time, we got some serious work to do.

So, meet Groovy Server Pages (gsp) - the grails solution to move the presentation logic out so that some artistic designers can work on them, and I can focus on coding the backend logic. Now, we all know that the infamous Convention over Configuration philosophy behind grails, and if we put the right file in the right place, everything will work out just fine.

And, and, and..... there is no configuration needed!!! Yay!

OK... lets focus on our objective today:

  1. Passing some values from the Controller to gsp,

We will talk about layout, data model and persisting data in some form of database in the following sessions.

Alright, first thing first, instead of rending HTML codes from the controller, we now do 1 step better; we keep some values here and pass them to the gsp for display. So, lets change our little controller like so:


def catalog = {
     
     def staticBrand = "Nikon"
     def staticModel = "D3S"
     def staticReview = "D3S is the best pro DSLR ever!"
     def staticReviewer = "JC Tai"
     def staticRating = 5

     [  
      brand : staticBrand, 
      model : staticModel, 
      review : staticReview, 
      reviewer: staticReviewer, 
      rating : staticRating
     ]

    }


Notice the square bracket? That's how the controller passes information to the gsp. Now, because of the convention over configuration philosophy, we do not need to create any configuration so long as we create the view here:


/grails-app/views/catalog/catalog.gsp


It is time now to write our view. Since my web designer is on leave today, I created the view by myself; and boy! This has already pushed my creativity ability to the limit! Lets see how it looks like:


<HTML>

 <HEAD>
  <TITLE>Camera Gears Review & Catalog</TITLE>
 </HEAD>
 
 <BODY>
  Brand: ${brand} <br />
  Model: ${model} <br />
  Review: ${review} <br />
  Reviewer: ${reviewer} <br />
  Rating: ${rating} stars <br />  
 </BODY>

</HTML>


Once we do that, grails automatically wires the controller and the view together. Not a line of XML has been written! Amazing! Now lets point our browser to


http://localhost:8080/camgear/catalog/catalog

and voilà!


If we are talking about cleaner codes, can any code be cleaner than this? Haha... joke aside. In just a few lines of code, we have managed to create a web application that is retrieving information from the controller, and yes, we have not done anything on database yet, but the simplicity of grails just blows me away!

OK, lets review what we have done so far:
  1. We have created a controller.
  2. We rendered HTML from the controller
  3. We stored some static values in the controller
  4. We retrieved these values from the controller and passed them to the gsp
  5. We have a VERY CLEAN web site running in just a few lines of code!
OK, so far so good. Next time, we will talk about a consistent layout for the entire web site. Stay tuned!
Related articles
  1. Tutorial 1 - Creating our first controller in grails
  2. Tutorial 3 - How to create a consistent look and feel with grails layout

Thursday, September 15, 2011

Creating our first controller in grails - Grails Tutorial 1

A few months ago I wrote an article about how grails makes it possible to write a quick application in 3 minutes. I knew I should have followed up with more stuff but works caught up and I procrastinated. I know, my bad, my bad...

Anyway, I am about to write a series of grails tutorial. Hopefully it can encourage more people to adopt this wonderful framework.

I love photography, and all the camera gears. So, lets base our tutorial with an online portal of camera products for browsing. Hopefully we can evolve this to something more substantial along the way.

OK, some fundamental first. The grails framework has been designed based on the MVC framework; and those who have developed in Spring Framework will find Grails a refreshing platform for rapid application development.

MVC Concept - The solid lines are direct association and the dashed one are indirect association.

So with that, we can start building our online camera catalog, and we are going to call our project Camgears. So lets create our first project with a simple command line:

grails create-app camgear

We will then see a bunch of activities happening in front of us. Once it's done, we will be able to start our application. The first thing that we need to do is to create a controller. Controller is the engine behind every grails application and they do the following few things very well:

  1. They receive user inputs from the web browser
  2. They invoke the necessary business objects to get things done
  3. They can also access your data model to retrieve information from your database
  4. And at the end they redirect the application to the appropriate pages for the end result to be displayed.

So with that understanding, lets start generating our first controller. First lets change to the proper directory:
cd camgear

Then we will generate the controller by issuing:
grails create-controller catalog

After this, grails actually create a the skeleton of the controller at /grails-app/controllers/CatalogController.groovy. The following is how the file looks like:

package camgear

class CatalogController {

    def index = {
    }

}

It looks pretty simple right now. But note that grails has actually created a simple index action for us. Lets say we really want the users to be automatically be routed to the catalog every time they visit our site, we can do the following:

package camgear

class CatalogController {

    def index = {
     redirect( action: catalog )
    }
    
    def catalog = {
     render "<h1> Welcome to our store </h1> <br>Under construction."
    }
}

Lets try to see if this works. Grails comes with a handy web server, and even in memory database (more to that later). To execute this, all we need to do is to run the following command:

grails run-app

And when everything is ready, point your web browser to:

http://localhost:8080/camgear
And you will see a nice web page with all the dirty work that grails has done for you. You can even see that the camgear.CatalogController has already been defined for you:


Now, lets click at the camgear.CatalogController and see what happens:


Something cool happens if you type the following URL:

http://localhost:8080/camgear/catalog/index

The page automatically gets redirected to

http://localhost:8080/camgear/catalog/catalog 

because of this code:


    def index = {

     redirect( action: catalog )

    }

Pretty neat huh? We only wrote a few commands and with only a few lines of codes, our first application is already up. That took less than 5 minutes.

I know, I know... some of you are going to complain about embedding HTML codes into the controller, which is a horrible idea. But we are going to make changes to this later in View and Layout.

Stay tuned.


Related articles
  1. Tutorial 2 - How to present ourselves to the world
  2. Tutorial 3 - How to create a consistent look and feel with grails layout


Sunday, May 22, 2011

Why is my iPhone getting insanely hot (literally)?

My iPhone is by far the best phone I have ever used; it is like a million times better than the other supposedly smart phone it replaced. I could acquire knowledge so much faster and better now that I feel like being a living proof of Bill Gates' infamous speech in 1990 - Information at your fingertips, although in a totally different context 20 years later.

Having said that, there have been a few times when my iPhone just got insanely hot, and then the battery was draining so fast that I thought there was an electronic vampire sucking the battery juice out of the phone. While I normally can manage probably 15 hours of usage a day (I am a heavy user who is constantly on the phone). On these few occasions the battery was flat within 2 - 3 hours without any significant changes in the pattern how the phone was used.

Now, if you are having/or have encountered similar problem, then this article is for you.

First thing first, iPhone is made up of 2 major components, the Hardware and the Software. A hot iPhone can be the result of the malfunction of either one of these components. The following steps help you to isolate the root cause of the problem and subsequently get it fixed.

Note
We are talking about prolonged period of heat with abnormal battery drainage here. If you are experiencing the heat for only a few minutes, then perhaps you can wait for a while to see if the problem persists. If true, then the following steps may help you.


Is this a hardware problem?

  1. Go to Settings

  2. Click General

  3. Click Usage


You should see something like this at the end of the steps. Now if there is a significantly big gap between usage time and standby time, and your phone is hot, it is probably a hardware failure. You can follow this link to check if there is a water damage to the phone, and the best way to fix this hardware issue is to return the phone to the service provider you got your iphone from and swap for a new one if it's still under warranty.

If you have gone so far, then this is probably a fixable software issue. Put it simply, the iPhone is so hot because it's been working overtime to get something done. The following are the common culprits that may cause the iPhone to work in the background:

  1. Push Mail

  2. Ping - IOS 4.3 and above

  3. Applications running in the background

  4. Notification Settings

  5. Others


From my own experience, the phone gets really hot usually when I am on my 3G data network, and the battery drainage also happens considerably faster as compared to when I am on EDGE or Wifi. The following are a few things that could help to solve this problem:

  1. Push Mail

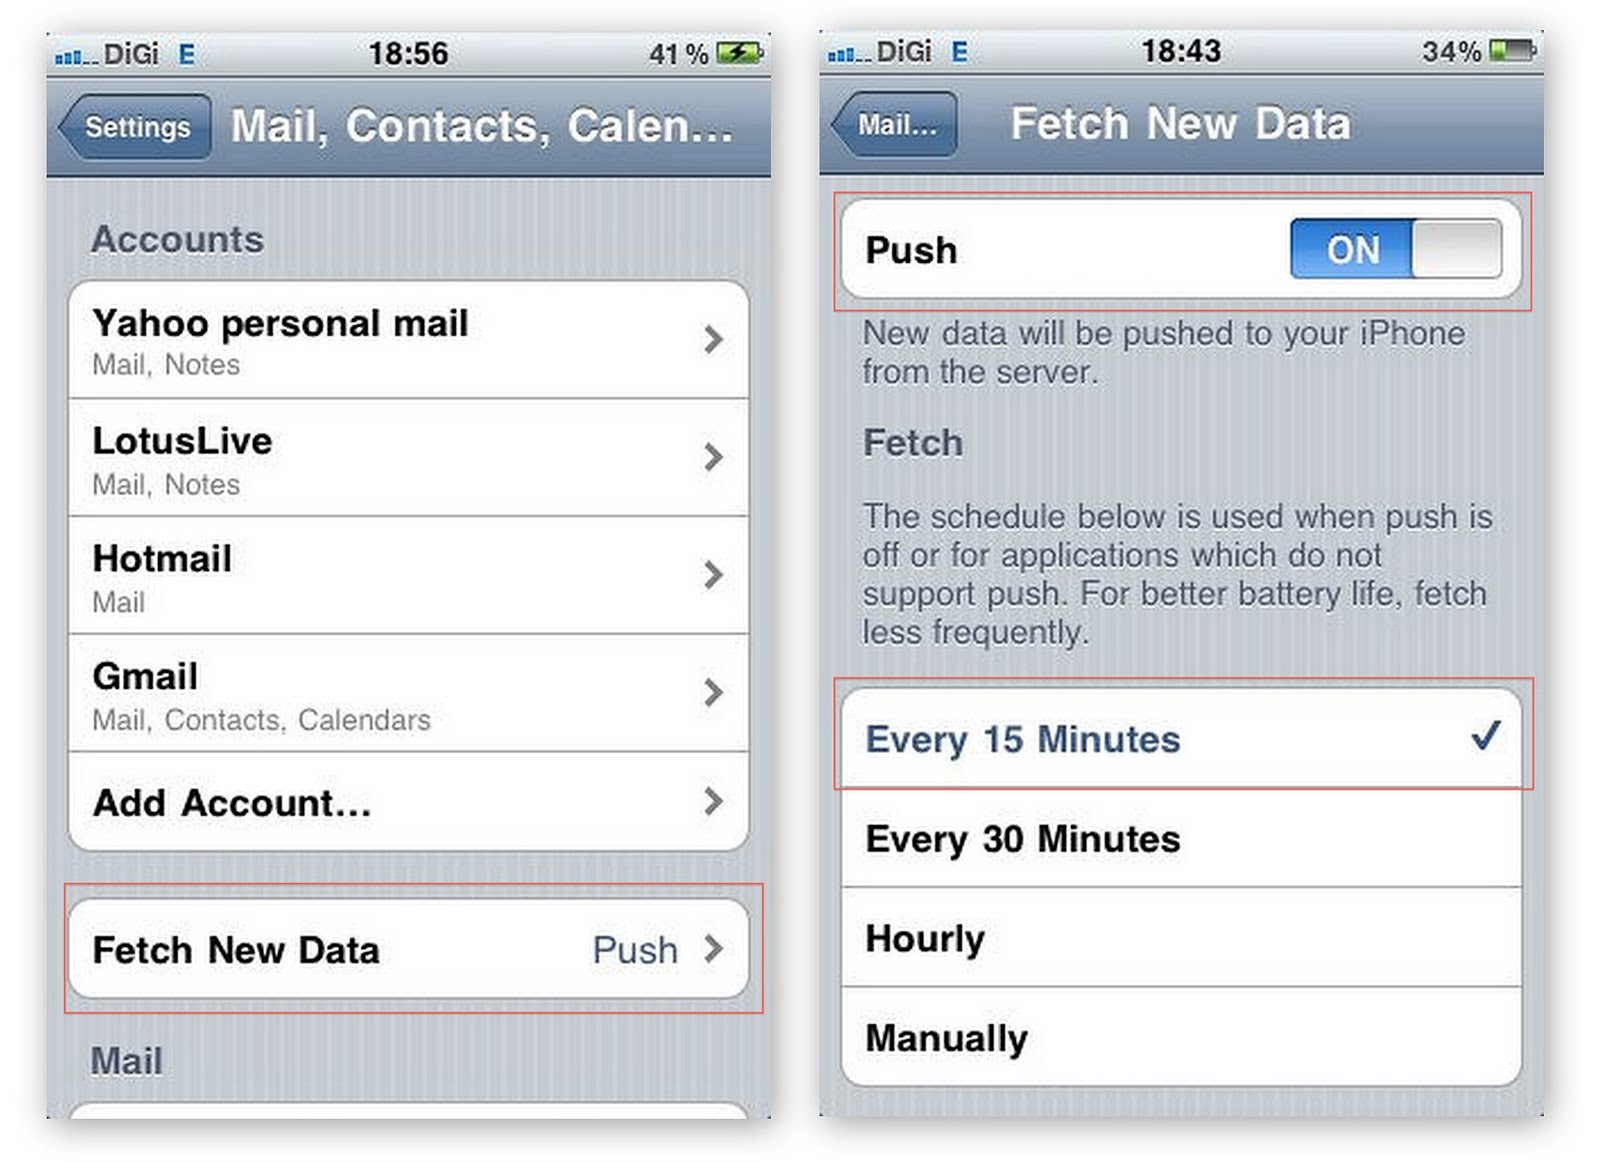
    iPhone would push mail from the server automatically for you so you don't have to. However, when the data signal is weak, iPhone would keep on trying to establish connections with the server for the push mail to happen. This as a result can cause battery drain, as well as pushing the temperature up for the phone.The following are steps to temporarily turn this off, and you can turn it back on when situation improves.

    1. Go to Settings

    2. Mail, Contacts, Calendars

    3. Fetch New Data

    4. Turn push to OFF

    5. Set Fetch to Manually


  2. Ping

  3. Put simply, Ping is Apple's attempt to turn iTune into a social network such as Facebook, or Twitter. Basically, users can see what their friends purchased, liked, and what concerts their friends are going, etc. Now, I don't need this service, and it's sucking the battery life of my phone, so it gotta go!

    To turn this off, do the following:

    1. Go to settings

    2. General

    3. Restrictions

    4. At this point, you may be asked to enter your password if you have enabled it before. Otherwise, IOS will ask you to create a new password to enable it.

    5. Turn PING to OFF


  4. Notification Settings

  5. Some of the applications may try to access the data network to pull for new notifications. Social network applications such as WhatsApp, Facebook, Twitter, etc constantly go online to check if there is any new updates. Usually this would not be a problem, but if your battery is draining like crazy, turn off all the notifications temporarily to see if things improve.

  6. Applications running in the background

  7. Simply kill all running applications in the background to see if things improve.

  8. Others

  9. Address below.


Now, if you have done all the above, and things don't get better, there are still three things that you can do. But please do a full backup before you perform any of the following steps:

  • Check if you have the latest firmware. This can be done by simply connecting your phone to the computer, and launch iTune. Click Check For Update. Update the firmware if there is a new version. I have fixed mine once using this approach.

  • If the above still fails, perform a RESET on the phone. Note: performing this steps WILL NOT erase your personal contents such as email, sms, or contact information. Similar steps are documented here.

  • Only do this if you have absolutely no choice. If you have taken all the above measures and still having this problem, then you may want to do a DFU restore. Before doing this, please make sure you have a FULL BACKUP first because the phone will be completely wiped out! So far I have managed to solve all my battery drainage problems without having to do this. You can follow the instruction at this link here to perform this restore.


Hope this helps, and good luck!

Saturday, May 14, 2011

iPhone Date & Time - Automatic Setting Went Wrong

I occasionally go to Thailand for business trip, in the past I usually had to adjust the clock on my phone to reflect the local time (Thailand is one hour behind Malaysia), and adjusted it again when I am back to Kuala Lumpur.

I still remember the very first time I went to Thailand after I got my brand new iPhone. Shortly after my phone was connected to the roaming network, I noticed the time was set back 1 hour. At first I was pleasantly surprised and at the same time skeptical about this, as I thought I had accidentally set the time without remembering it. But when I checked at my wife's phone (she does not have such habit) it was automatically set to the local time as well!

Being a curious guy, I checked all the setting and found out that iPhone had the ability to automatically set the date and time for me. This is really cool!


When I returned to KL on that trip, I made a mental note to observe if the phone was really so smart and would change the time back to the Malaysian time. And it did!

WOW! This is a a real smart phone! And this feature added to another one of my favorite things about the phone.

Shortly after I upgraded to IOS 4.3.2, I went to Bangkok again for another business trip. The time was changed to local time automatically. All went well and when I returned to KL, and to my horror, the time was still one hour behind! The funny thing was that when I disabled Set Time Automatically, the clock shows KL time again without me having to manually adjust for it.

So I left it as it was. But deep down I was not happy knowing that one of the features in my favorite phone was not working perfectly anymore.

Some of the my friends may remember that I had some real issue with my phone after the upgrades to IOS 4.3.2. Apps were crashing, and phone was getting really dysfunctional.

Before upgrading to IOS 4.3.3, one of the things I did was to reset all settings on my phone. After the reset, I went to the time & date setting to see if this was also reset - and it did. It was reset back to Set Automatically. And you know what? The time is now correctly set.

I guess IOS somehow cached the Thai timezone in its setting somewhere and did not release this.

For those of you who are having this problem, follow the following steps to reset your phone. These steps WILL NOT ERASE your contact information, SMS, EMAILS, etc. You do however need to key in the wireless WEP keys again, and all the remembered networks will be forgotten.

1. Click Settings
2. Scroll down and click General
3. Scroll to the very bottom and select Reset
4. Select RESET All Settings


Oh by the way, my friend Rachel also had an issue with her WhatsApp not being able to connect to the WIFI network on her iPhone. After this steps, the problem was resolved.

Good luck!

Saturday, May 7, 2011

How to stop iTunes and iPhoto from launching unnecessarily

I love my Macbook. I also love my iPhone.

But I hate it when my iPhone connects to my MacBook. For no apparent reasons - Apple thinks that automatically launching iTunes and iPhoto for me would make my life better.

Well, no, it does not! In fact, it annoys the hell out of me. Imagine your car manufacturer decides to start the engine, the massager chair, the radio and the GPS automatically every time you open the door of your vehicle, regardless of the fact that you are only trying to retrieve a document from the car.

So automation does not just make the system smarter. Sometimes it makes it dumber. And the fact that I always have to close whatever that's opened by Snow Leopard just a few seconds later proves the point.

So, if you are as paranoid as me (admit it), and only want your system to act at your command, the following tips might help.

First to stop iTunes from automatically popping up:

1. Connect your iPhone to your Mac
2. Start iTune (oops, I forgot, Apples starts it automatically for you at this point, DUH!)
3. Click at the phone under devices
4. At the summary page of the phone, scroll down to the Options.
5. Uncheck Open iTunes when this phone is connected.

You are done.


So that got rid of half of the annoyance. Now, lets work on the iPhoto part.
1. Connect your iPhone to your Mac
2. Click at spotlight
3. Type Image Capture
4. Select your iPhone under Device
5. Select "No Application" under Connecting this iPhone opens

Done.


And now I am a happy camper! :D

App Crash after IOS 4.3.2


I have been experiencing lots of issues with my iPhone ever since I upgraded to IOS 4.3.2. I mean the app just crashed for no particular reason, and that really annoyed me. It was not only the third party apps that crashed on me, core iPhone applications such as App Store and Safari were also crashing on me.

So I did a check on Google and found out that I was not suffering alone; and a lot of iPhone users who upgraded also suffered the same fate. So I followed the instruction to first reset my network setting, then erase all contents and subsequently restore from iTunes, to hard reset. The phone would work fine for a while and then the apps would just crash again like before.

When the release of IOS 4.3.3 was available on May 4, I was ecstatic that my misery was soon going to end. Did a sync on my iTunes (learned my lesson), and then proceeded to upgrade my phone.

IOS 4.3.3 definitely made the phone more stable, but after a while, apps started crashing again. I could not understand why and finally I thought I should be looking what's going on under the hood myself! So I fired up SYSTEM Lite and found out that I only had 4MB of RAM free! So that's the problem!

A quick switch to process mode and then I found out - for some weird reason, although some of the apps are not showing in my springboard, they were actually running in the background thus consuming those precious precious memory! Launching those running apps in the background and then subsequently killing them freed the much needed memory for me, and boy, my phone was running like new again!

So the bottom line is, if you are on 4.3.2 and cursing your phone as I did, upgrade to 4.3.3. And if you are on 4.3.3 and still suffering the same problem, install SYSTEM Lite (it's free) from iTune and find out what's going on behind the scene. For some reasons some apps were just running by itself (probably due to my pushed notification setting). Terminating some of the unneeded apps would gives you the most precious resources in all computing world - the RAM!